Vim Tutorial: The Basics
Table of Contents
The Basics
Even if you’re an experienced vim user you might want to skim this section.
Introduction
There are countless vim tutorials out there, so why this one? What’s different here is:
many tutorials miss a lot of defining features of vim. Vim is about being fast, efficient, and moving your hands as little as possible to get the most done. We will be focusing on that right from the beginning. My index fingers sit on the f and j keys and my wrists won’t lift off my laptop for anything here. This should be your goal. This is why even if you use vim I suggest skimming over the basics.
we will start from the very beginning and get you up to an intermediate level. Why not advanced? Because there is really no such thing. You will always be learning new things in vim and mastery takes a lifetime. The nice thing about vim is that you can constantly learn new things about it and how to do things more efficiently. Don’t worry though, with just a few commands under your belt you can do a lot. Over time you will learn a lot more and impress all your friends.
In this tutorial we will focus less on commands, but on vim “theory”. To get to mastery we need to be able to understand vim and how it works, not just memorize a bunch of commands. Thus, we will be focusing on the former before we introduce the latter. This will help you memorize these commands, because it will greatly reduce the load.
Why should I even learn vim? My editor is better!
Cool! I don’t care. Go learn your editor then. Your editor is all about productivity. If you want to use something other than vim, then go ahead. But I will give you the one reason why everyone should know the basics.
If you touch a *nix computer, it will have vi installed. Not vim but vi. Knowing just some basic stuff will allow you to work on almost any machine. You aren’t guaranteed emacs, sublime, or whatever, but you will find vi. Because of this I think the majority of programmers should at least know how to write a file.
Modes
Before we get started we have to mention something about vim. Vim has different command interfaces, which we will call mode. normal mode is when your key presses perform actions. You cannot write in this mode. insert mode means the keys you press are going to enter into the terminal. There’s other modes that we’ll introduce later but we will run into these two modes right away. This is the largest hurdle for learning vim and it turns many people away. If you have ever heard someone call vim a “random text generator” you can assume they never got past this concept.
Write A File
This is the absolute basics. If you’ve done vimtutor you can skip this section.
How do I write a file? Vim is just a random text generator!
Great question!
So what did I press?
1
2
3
4
5
6
i
press `i` to enter insert mode
press <C-[> to escape back to normal mode
press :x to save and quit.
<C-[>
:x
Here we started in normal mode, so we had to enter insert mode by pressing i. Once there we could type to our hearts content. When we were finished we pressed <C-[> (this is the same as Ctrl + [, we will use the previous notation) to go back to normal mode and then typed :x to save and quit.
There are some things different that you may have noticed. I didn’t press esc to get back to normal mode (You can also use <C-c>. That’s because that button is too far to reach. Seriously! Vim is about being fast and not having to move your hands much. If your wrists come off the keyboard then you’re probably doing it wrong! This is the vim way. The second thing is I didn’t type :wq to write and quit. That’s because it has an extra letter and we don’t need that kind of negativity in our lives.
Commands we learned
i takes you from normal mode to insert (writing) mode
<C-[> and esc take you from insert to normal mode
:x saves and quits. :w writes. :q quits.
If you get in trouble just yell at the computer to quit. If your computer doesn’t have a built in microphone try the command :q!. It’ll listen then.
Movement
Thou shalt not use the arrow keys
This is one of the commandments of vim. We will never use the arrow keys. (If you look in my vimrc file you will notice they are enabled, that’s for others. Your configuration should also be usable by others).
Movement is done in normal mode (We’ll be hitting <C-[> a lot).
Our basic movement is h,j,k,l. These correspond to moving left, down, up, right, respectively. Essentially these are your new arrow keys (you’ll also be surprised how many programs and websites allow you to use this movement pattern).
But we want to do more. So here’s a quick list of the most common patterns I use
1
2
3
4
5
6
7
8
9
10
11
12
13
14
15
16
17
18
19
20
21
22
gg      Goes to the top of the file
G       Goes to the bottom of the file

H       Places the cursor at the top of the screen (High)
M       Places the cursor at the middle of the screen (Middle)
L       Places the cursor at the bottom of the screen (Low)

w       Moves forward by word
b       Moves back by word
^/0     Moves to the beginning of the line
$       Moves to the end of the line

zt      Moves the screen so the top is at the cursor (top)
z.      Moves the screen so the middle is at the cursor (middle)
zb      Moves the screen so the bottom is at the cursor (bottom)

<C-f>   Moves the page forwards
<C-b>   Moves the page backwards

f a     Moves the cursor to the next instance of "a" (find)
/foo    Searches for the next instance of "foo"
*       Searches for the next instance of the word that the cursor is on
These are the most common movements I use. Pretty much with these and hjkl you can get anywhere on the page in just a few movements.
Now try placing numbers in front of them. Like 17G (it’ll take you to the 17th line!) Where it logically makes sense to use a number, it probably works there.
Editing
For most of this we will be in normal mode but a few instances will be from insert mode.
Editing is the point of an editor, so let’s get to it!
Editing in normal mode
We’ll be learning the following commands
1
2
3
4
5
6
7
8
9
10
11
12
x       delete a single character
dd      deletes the whole line
d$/D    deletes to the end of the line
dgg     deletes to the top
dG      deletes till the end of the document

yy      yank the entire line
p paste it

u       undo (what you last did in insert mode)
U       undo everything!
<C-r>   redo
Now that we have some movement and editing under our belt we should easily be able to do the following. (At the end we undo and the redo) 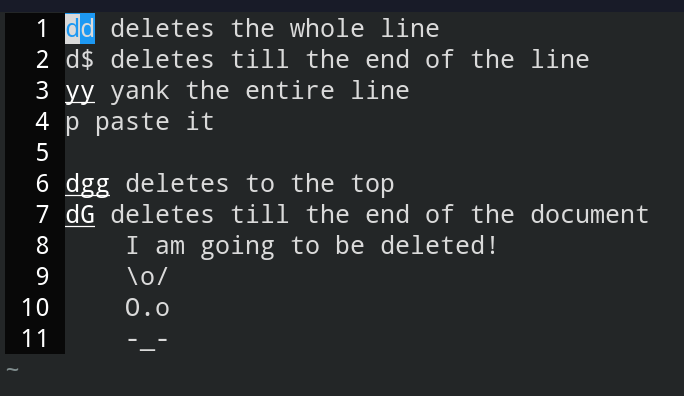
Entering Insert mode
Part of editing is actually writing. So we need to figure out how to actually write text. We’ll be learning the following commands
1
2
3
4
5
6
i       enter insert mode at cursor
a       enter insert mode and move cursor right
I       enter insert mode at the beginning of the line
A       enter insert mode at the end of the line
O       enter insert mode above current line (new line)
o       enter insert mode below current line (new line)
Really you just have three things to learn here: i, a, and o. 
A key thing to notice is down in the bottom left. You’ll notice when I’m in insert mode. When there is nothing there I’m in normal mode. All of the above commands are performed while in normal mode.
Basics Summary
That’s it! You are now able to use vim. Just with these commands you can navigate and do some basic editing. If you can do everything here you can honestly say that you “know vim”. If you get good at the above, most people will think you’re good at vim. But we want to be better at than that. So keep reading.
You may have noticed that some commands (like yank, go, and delete) are multi-letter commands. This is because the first letter is telling you the command and the second letter is telling you the action. For example delete has a movement command after (try d + $). Play around with this and keep it in mind as we continue.
Next let’s look at the Vimrc.